Core Interaction Lab: Week 5
Review JS and User Events
Jump to Intro, Variables, Booleans, Javascript in HTML, Conditionals, Loops, Arrays, Writing to HTML, HTML Elements in JavaScript, Intro to Events, Event Listeners, Event Targets, the Event Object, and Tying it All Together.
Intro to Javascript
Javascript is a programming language that we can use to provide instructions to the computer of anyone who visits our website. Javascript is what makes websites dynamic and interactive; it is what turns your "web site" into a "web application." In class, we covered these aspects of Javascript:
- Data types, such as numbers, strings (sequences of literal characters), booleans (true/false) and arrays (lists).
- Variables, which let us store information for later use.
- Properties and functions that are built in to varying data types, which let us examine, change and query our variables.
- Conditional statements and comparison operators, which let us make logical decisions in our code.
- Loops, which let us repeat code and move through arrays.
Let's go through those again now.
First, we need a place to run our Javascript. Just like how we used the web inspector to observe and debug our CSS, we can do the same for Javascript. In your web inspector, there is a tab at the top called "Console." When you click on this tab, you are presented with a blank window which we can use to input and run Javascript.
The Javascript console is an important tool. You will use it to view errors and to debug or inspect your code. For right now, we can use it to explore some Javascript basics.
The first thing we did in the console was to enter two different commands:
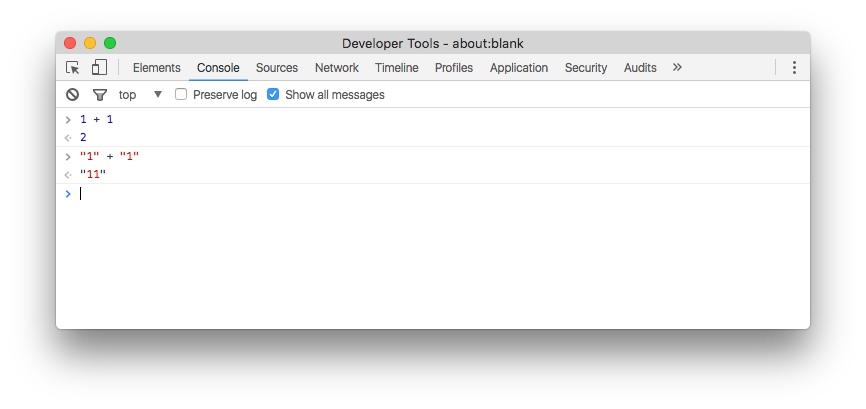
The first command, 1 + 1, outputs the number 2, as we would expect. But the second command, "1" + "1", outputs "11". Why? In the first example, we were adding numbers together. When we type a number directly in our code, Javascript interprets it as the value that the number represents. When we put quote marks around it, however, we are telling Javascript to interpret the value as the literal symbol "1". This is called a string. We will use strings mostly for words - instead of "1" + "1", we could have written "My name is " + "Sam" and Javascript would effectively do the same thing.
The next thing we did was to explore properties and functions contained within a string. For example:
"Hello World!".length                 // 12
"Hello World!".toUpperCase()          // "HELLO WORLD!"
"Hello World!".includes("World")      // true
"Hello World!".includes("Moon")        // false
In all of these examples, the dot, ., is used to access the properties and functions of the string. The first example, length, is a property. Strings don't have too many properties, and in fact, this is the only one we'll really ever use. It tells us how long the string is, and if you count it yourself, you will find that there are 12 characters in "Hello World!". Remember that a space still counts as a character.
The second example calls a function named toUpperCase on our string. You can guess based on its name what that function might do! The two parentheses at the end of a function's name means "run this function," and the result is a copy of our string with all of the letters turned into uppercase.
The third and fourth examples introduce something new into a function call: parameters. Parameters are additional pieces of information that a function needs to work correctly. includes is a function that tells us if a string includes another string. We can run the function with our string to search for - "World" - in between the parentheses. This is called "passing," as in I am passing the string "World" to my function so it can work correctly.
We're going to come across many different Javascript functions that work in different ways. How do we know what they all are and how they all work? We could consult the reference, but that can be a little dense. Sometimes the best way is just to search for what you're after. If you an phrase what you want to do as a single operations, often a search engine will be able to find exactly what you're looking for. For example, searching "javascript find string in another string" gives me a few different options.
Variables
What if I don't want to keep typing "Hello World!" every time? If I want to save a piece of information - a number, a string, the result of a function, or any other data type we will encouter later - I can save it as a variable.
var myVar = "Hello World!"
myVar.length                    // 12
myVar.toUpperCase()             // "HELLO WORLD!"
myVar.includes("Moon")          // false
myVar                            // "Hello World!"
There are four parts to making a variable. First, we use the keyword var to let JavaScript know that we're making a variable. var is a special word and we shouldn't use it anywhere else. The next part is the name of our variable. In this case, the name is myVar. The third part is the equals sign. Everything that follows the equals sign, until we hit the end of the line, will be executed by JavaScript and the value will be assigned to myVar. That's the fourth part: the statement to run and assign to the variable. In this case, it's just a string. Once we've done that, we can call all the same functions and properties on myVar as we could on any other string.
Notice how even after calling myVar.toUpperCase() that the value of myVar is unchanged. How would we overwrite myVar with the value of a new function? Hover here for an answer: myVar = myVar.toUpperCase()
Booleans and Comparison
Booleans are a data type that has only two options: true or false. Like var, true and false are special words in JavaScript. We're not going to see them directly all that often, however. Instead, we use comparison operators to generate boolean values for us. Here's an example:
"Cat" == "Dog"                 // false
"Cat" == "Cat"                 // true
"Cat".toLowerCase() == "cat"   // true
==. == is a comparison operator, meaning it takes what is on either side of it and compares them according to a certain rule. In this case, the rule is "are they equal to each other?" If that's the case, then the result is true, otherwise it's false. There are other comparison operators, for example:
1 < 0                  // Is 1 less than 0? false!
1 > 0                  // Is 1 greater than 0? true!
8.9 <= 9               // Is 8.9 less than or equal to 9? true!
"Happy".length >= 5    // Is the length of the string "happy" greater than or equal to 5? true!
There are a few more that we'll get in to next week.
JavaScript in HTML
At this point, the console will stop being a good place for us to write JavaScript. When we were in class, we made ourselves a new HTML page and a new JavaScript file called week5.js. Just like we used the <link> tag to import a CSS file last week, we can use the <script> tag to import JavaScript. That looks like this:
<script src="week5.js"></script>Put that tag right before the </body> of your HTML file, near the bottom. Now we can now switch to week5.js and do all our typing in there.
There's one last thing we need to remember from here on: in the console, we could just run a function and the console would show us the output. That's not the case anymore. If we want to see something on the console, we need to pass it the value to show with console.log(). For example, console.log(myVar) will show us the value of myVar.
Conditionals
It's great that we can figure out if a string exists in another string, but what good is it if we can't do anything with that information? That is where conditional logic comes in. Conditional logic lets us say "if this, then do that." "If the dog is a good dog, then it gets a treat." "If you help me move, I will buy you a pizza. Otherwise, our friendship is over!" These are all examples of conditional logic. Conditional logic ultimately comes down to one thing: is it true?
Here's how that translates to Javascript:
if (true) {
    // do A
} else {
    // do B
}
The new statement here is if. An if block has at least three parts: First, the word if, a special word in JavaScript. Next, a set of parentheses. Inside the parentheses we can put whatever Javascript statement we want. If the result of that statement is true, the code inside the curly brackets will run. Optionally, we can use the word else and another set of curly brackets to supply code that should only be run if the initial statement is false.
The value in the parentheses can be anything you want so long as it evaluates to a boolean. In this example, I just put the value true in the parentheses. This means that Javascript is asking "does true equal true?", which of course it does. In that example, only the first "A" block of code will ever run.
Let's try replacing true with a comparison statement.
var myVar = "Hello World!"

if (myVar.includes("Hello")) {
    console.log("The word 'Hello' appears in " + myVar)
} else {
    console.log("The word 'Hello' does not appear in " + myVar)
}
In this example, we are figuring out if a word appears in a sentence. Because the includes gives us either true or false as an answer, we can plug it in to our conditional statement perfectly. If our variable includes the word "Hello", the first block of code will run. Otherwise, the second block of code will run.
Loops
Loops let us do one thing multiple times. Here's a basic loop:
for (var i = 0; i < 10; i = i + 1) {
    console.log(i)
}
The first line contains a three-part statement that defines how our loop works. Each part is separated by a semicolon. The first part, var i = 0, defines the start point of our loop. The second part, i < 10, defines the condition under which our loop will continue to run. As long as this statement is true, our loop keeps running. The third part, i = i + 1, is what to do after every loop finishes. In this case, it's add one to i.
Then we have two curly brackets. Everything inside the curly brackets will run once for every loop. In this case, just log the value of i. Run the code and you should get a list of numbers from 0 to 9. You don't see the number 10 because 10 < 10 is false. This stops the loop from running any further.
Try playing around with the parameters of the loop and see what happens. What happens when you change the initial value of i from 0 to 5? Or when you change the end condition to i < 1000? Or when you increment i by other numbers, like 2 or 10?
Arrays
The final data type we learned in class was the array. Array are just lists of things. They can contain anything!
var myArray = ["Cat", "Dog", "Chicken"]
The above code declares an array with three elements. The square brackets denote the beginning and end of the array, and a comma separates every element within it. Which of the following are valid arrays?
[1, 5, "Octopus"]               // 1
40, 50, 60                      // 2
[true, true, true, true, true]  // 3
"[1, 2, 3]"                     // 4
Hover here for an answer: 1 and 3 are valid arrays. 2 is invalid because it has no square brackets. 4 is a string because it is wrapped with quotes.
We can access individual array elements by their index. Array indexes start at 0 and go up. For example:
var myArray = ["Cat", "Dog", "Chicken"]
console.log(myArray[0])                    // "Cat"
console.log(myArray[1])                    // "Dog"
console.log(myArray[2])                    // "Chicken"
Arrays also have built in functions and properties too. Like a string, they have length to tell us how long they are and includes to tell us if something is in an arry. They also have a function push which allows us to add something to an array:
var myArray = ["Cat", "Dog", "Chicken"]
myArray.push("Butterfly")
console.log(myArray)                     // ["Cat", "Dog", "Chicken", "Butterfly"]
Arrays and loops go well together. For example, we can loop through an array to see everything in it:
var myArray = ["Cat", "Dog", "Chicken"]

for (var i = 0; i < myArray.length; i = i + 1) {
    console.log(myArray[i])
}
Notice that instead of hard-coding a number to finish our loop at, we changed it to reflect the length of the array. No matter how many elements we add to the array, that loop will still work!
Writing to HTML
So far, the only output we've worked with is console.log(). Soon, we'll learn about special Javascript functions that help us create and edit HTML and CSS, but for now, there's an easy way you can output information to the actual webpage:
document.write("hello!")
Try running that and see what happens on your page. The neat thing about document.write is that it actually writes HTML, not just words. For example:
document.write("<h1>Hello</h1>")
It's also important to remember that because the document.write function takes a string as a parameter, you can put whatever you want in there as long as it results in a string. For example:
var x = "Hello World!"
document.write(x)
Working with HTML Elements in JavaScript
Consider everything you can do to an HTML element. In your HTML file, you can do things like change its contents, add a class, or maybe change the value of an attribute. In your CSS file, you can do things like change its border, position, or margin. We can also perform all of these actions in JavaScript. If we have a reference to an HTML element in our JavaScript code, for example, I can change the property innerHTML to change the contents of the element. Or, I can call the classList.add() function to add a class. Or, I can change any and every CSS style in the style property to change its appearance. There are hundreds of different properties and functions on HTML elements that we can observe and modify through JavaScript. But before we can do any of that, we need a way to get an HTML element in to JavaScript.
We just saw how the function document.write() works. We can break that down into two pieces: document and write. The first, document, is a special variable in JavaScript that refers to everything in the browser window, and the second, write, is one of the many functions that document provides.
Let's take a look at another document function: getElementById. What this function does is to find an element from our page with whatever ID we ask for. For example, if we have the following HTML:
<p id="intro">Hello!</p>Then we could write the following JS:
var myIntro = document.getElementById("intro")
console.log(myIntro)
And in our console, we will see the HTML element returned to us. Once we have a reference to an HTML element, we can do all sorts of things to it. Try the following out in your browser:
myIntro.innerHTML = "Goodbye"myIntro.style.backgroundColor = "red"There are more ways to reference HTML elements in JavaScript that are worth looking in to: document.getElementsByClassName returns an array of elements that have a specified class name (remember: IDs are unique on a page, but you can reuse classnames on as many elements as you want). document.getElementsByTagName returns an array of elements with a specified tag name, for example every img on the page.
There's also a way to create an element from scratch, with document.createElement, which you can then add to the page with document.appendChild like so:
var myElement = document.createElement("p")
myElement.innerHTML = "Hello!"
document.body.appendChild(myElement)
Working with HTML Elements in JavaScript

Intro to Events
Think of all the things that happen within a web browser that change your experience of the page. Using your mouse, you can hover, click, scroll and resize the page. With your keyboard, you can type into the browser. On your phone, you can touch, pinch, and rotate the page. These actions (and many, many others!) are called "Events." Javascript gives us a way to wait for and respond to Events.
There are essentially two parts to every Event: the type and the listener. The type of event is a string that refers to what you want to listen for; examples include click, keypress, and scroll. The listener is a function that tells your page what it should do when the event happens. Because it's a function, you're able to write whatever Javascript you want to respond to the event. It doesn't change the code you've been learning, it just changes when that code is run.
Events are usually phrased as "when (x), do (y)." For example, "when the user clicks on the page, change the background color," or "when the user tries to leave the page, activate a popup asking them if they're sure." As the latter (truly evil!) example shows, the power to react to the user's behavior opens up a world of design decisions we're able to make that can fundamentally change a user's response to our site.
Event Listeners
The function we use to add event listeners is called addEventListener (documentation). Let's see a quick example of it in action:
var blueButton = document.getElementById("blueBgButton")

blueButton.addEventListener("click", handleBtnClick)

function handleBtnClick() {
    document.body.style.backgroundColor = "lightblue"
}
The first line gets a reference to a <button> element I've placed on the page. I'll explain why we need it shortly.
Let's break the next line down word by word:
blueButton: This refers to the object on the page which we want to bind our event. In this example, it's a button I've added to the page. But you can subsitute this with any HTML Element you want - for example, binding an event todocument.getElementById("myButton")would mean the event is only triggered when the action takes place on the element with an ID of "myButton". You can also bind an event to the entire page by usingdocument.addEventListener. This item that the event occurs on is called the "event target."addEventListener: This is the function we use to add an event listener. BecauseaddEventListeneris a function, we need to call it by using parentheses. The parentheses will also let us pass in the two parameters required by the function."click": The first parameter toaddEventListeneris the type of event we want to listen for. Here's a complete list of every event you can listen for.handleBtnClick: The second parameter toaddEventListeneris the function we want to call when the event is triggered. In this example, I called my functionhandleBtnClick, but you can call it whatever you like, so long as you then define that function. This function is known as an "event handler."
After that, I declare my handleClick function and in there, I place code that should look familiar by this point - I just change the value of one of the styles on my page. In this function, you can write whatever Javascript you want!
Event Targets
Assuming you now have a light blue background color on this page, let's give ourselves a way to switch it back to its normal white. Instead of a button though, let's make a different type of target, to prove that addEventListener works on all sorts of targets. In fact, I've made the event target for the event this very paragraph! Click anywhere on this text and the page will switch back to white.
var whiteP = document.getElementById("whiteP")

whiteP.addEventListener("click", handlePClick)

function handlePClick() {
    document.body.style.backgroundColor = "white"
}
The Event Object
Sometimes it's not enough to just know that an event has happened - sometimes we want to know additional information about an event. For example, for a keypress event, I probably want to know which specific key the user pressed. Or for a click event, I might want to know where on the page the click happened. We can access this information with the event object.
The event object is an object that's passed in to our event handler as a parameter. It contains different information depending on the event type, for example, a mouse-based event is going to have different information than a keyboard-based event. The easiest way to inspect the event object is with console.log:
document.addEventListener("mousemove", handleMouseMove)

function handleMouseMove(evt) {
    console.log(evt)
}
First, notice how I've added a parameter called evt to my function definition. This tells Javascript that my event handler accepts an event object. You can call it whatever you want, but most commonly you will see it called either e or evt.
Second, I pass evt straight in to console.log so we can see it. Open up the console on this page and move the mouse around to see how often that event gets triggered. Then click the triangle next to the logged event to expand the object and see all the event metadata we have access to. We have properties like pageX and pageY that tell us the coordinates of the mouse cursor. We have properties like target that tell us which element our mouse was over when the event was triggered. We even have a property shiftKey that tells us if the user was holding their shift key when the event was triggered. And the list goes on!
Tying it All Together
Let's use Events to make our page interactive! In this example, I'll let users scroll this page by pressing numbers on their keyboard - click on the page and try it out now with your number keys.
Let's plan this out from the end result and work backwards. This will make sure that we can account for any "known unknowns" in the logic of our project.
- The last thing we'll need to do is to scroll the page for the user. By searching for "javascript scroll page," I found that there's a method called
window.scrollTo(documentation) that will do this for us. - The documentation for
scrollTosays that we need an x coordinate and a y coordinate. Since we're scrolling vertially, our x coordinate will always be 0. But we still need to figure out what our y coordinate should be. - We can use a bit of math to figure out what our y coordinate for scrolling should be. I know that the user can type the keys from 0-9, and I'm guessing that there's a way I can figure out the total height of the page. If I can turn the numbers from 0-9 into a percentage (by dividing by 9), then I can multiply that by the total page height. Then, when the user presses 0, the y coordinate will be
(0/9) * the page height(which would be 0, or the top of the page), and when the user presses 9, the y coordinate will be(9/9) * the page height, which is the bottom of the page. Every other number will be spaced out evenly. - To do this, I need two things: first, the key being pressed. We'll see in a second that this is sent by the event object. Second, I need to know the total height of the page. By searching "javascript page height" I found that there's a property called
document.body.scrollHeightthat will tell me how tall my page is. - And then finally, I'll need to know when a key is pressed at all, which I can do with a
keypressevent listener.
That tells us everything we need to know to get this working. Let's get started!
Since this interaction is based off of the keypress event, let's write that out first. Let's also log out the event object sent by this event so we can figure out what information we need to pull out of it.
document.addEventListener("keypress", handleKeyPress)

function handleKeyPress(evt) {
    console.log(evt)
}
Run this code in your own browser and open the console so you can see what happens. Click anywhere on your page and start typing - you should see some events being logged out to your console. One of the first properties you can see in your console is called key and you'll notice that it refers to the key that you pressed. For example, when you press the K key, the console says that key: "k". When you press the 4 key, the console says key: "4", and so on.
Next, we need to take that keypress value and turn it into a y coordinate for us to scroll to. I mentioned earlier the simple formula we can use to do this - first, we turn the number into a percentage (that is, a number between 0 and 1), and then we multiply that percentage by the overall page height. To turn a number into a percentage, we divide it by its maximum value. In our case that's 9, because 9 is the highest key. Let's update our code to do this math:
document.addEventListener("keypress", handleKeyPress)

function handleKeyPress(evt) {
    console.log(evt)

    var percentage = evt.key / 9
    console.log(percentage)
}
Now when you type numbers you should see a decimal number appear in your console. For example, when you press the 1 key, your console should say 0.111111, because that's what we get by dividing 1 by 9. And when you press the 9 key, your console says 1 because 9 / 9 = 1.
Now that we have a percentage, we can multiply it by our new target value to get a number that represents some percentage of our overall page height. For example, if my page is 2000 pixels tall and I hit the 2 key, I should jump to 444 pixels down my page because 2 / 9 = .22222, and .22222 * 2000 = 444.44. The specific numbers aren't that important; our code will hide all the hard math away from us. But I mention it because it helps lay out why we even need to do this math in the first place. So let's add that in to our code:
document.addEventListener("keypress", handleKeyPress)

function handleKeyPress(evt) {
    console.log(evt)

    var percentage = evt.key / 9
    console.log(percentage)

    var targetHeight = percentage * document.body.scrollHeight
    console.log(targetHeight)
}
Remember that document.body.scrollHeight is the way we looked up earlier to get our page's overall height. At this point, you will probably also want to add some images or text to your HTML to give your page some height we can work with.
According to the plan we laid out earlier, the only thing left to do now is actually scroll the page for the user. To do this, we just need to pass targetHeight into window.scrollTo, which we looked up earlier. If we go back to the documentation for the function, we can see that the second parameter is the y coordinate. For the first parameter, the x coordinate, we can just pass 0.
document.addEventListener("keypress", handleKeyPress)

function handleKeyPress(evt) {
    console.log(evt)

    var percentage = evt.key / 9
    console.log(percentage)

    var targetHeight = percentage * document.body.scrollHeight
    console.log(targetHeight)

    window.scrollTo(0, targetHeight)
}
And there we have it! If you play around typing, you'll notice one strange behavior with our program: pressing a letter key sends the page up to the top. Why do you think this is? Look through the console.log statements and see if you can find a way to prevent our event handler from reacting to letter keypresses. Here are two hints to help:
- The function
isNaNwill tell you if a value isNaN(a special value in Javascript meaning "not a number") or not. Here's the documentation for it. If you pass itNaN, it will returntrue, otherwise it returnsfalse. - We can use the Javascript statement
returnto exit out of our function early.